做开发这么久了,还不会搭建服务器Maven私有仓库?这也太Low了吧

 分类:
分类: 已被围观
已被围观 最近不少小伙伴想在自己公司的内网搭建一套Maven私服环境,可自己搭建的过程中,或多过少的总会出现一些问题,问我可不可以出一篇如何搭建Maven私服的文章。这不,就有了这篇文章嘛。
好了,其他的不多说了,接下来,我们就一起来搭建Maven私服环境吧!
环境说明
-
环境:CentOS 6.x~8.0、 JDK8、 Sonatype Nexus、 Maven
-
IP:192.168.50.131
-
root 用户操作
安装Nexus
前提:已安装 JDK8 并配置好了环境变量,小伙伴们自行搭建JDK8环境,这里我就不再赘述了。相信小伙伴们都能够正确搭建JDK8环境。
下载Nexus
下载Nexus(这里,我使用的是:nexus-2.11.2-03-bundle.tar.gz) ,下载地址:http://www.sonatype.org/nexus/go/ ,我们也可以在服务器的命令行输入如下命令下载nexus-2.11.2-03-bundle.tar.gz安装文件。
# wget https://sonatype-download.global.ssl.fastly.net/nexus/oss/nexus-2.11.2-03-bundle.tar.gz1.2.
也可以到链接:https://download.csdn.net/download/l1028386804/12523592 下载
解压Nexus
# mkdir nexus# tar -zxvf nexus-2.11.2-03-bundle.tar.gz -C nexus# cd nexus# lsnexus-2.11.2-03 sonatype-work(一个 nexus 服务,一个私有库目录)1.2.3.4.5.6.
(一个 nexus 服务,一个私有库目录)
编辑 Nexus
编辑 Nexus 的 nexus.properties 文件,配置端口和 work 目录信息(保留默认)
# cd nexus-2.11.2-03# lsbin conf lib LICENSE.txt logs nexus NOTICE.txt tmp1.2.3.
查看目录结构, jetty 运行
# cd conf# vi nexus.properties# Jetty sectionapplication-port=8081application-host=0.0.0.0nexus-webapp=${bundleBasedir}/nexusnexus-webapp-context-path=/nexus# Nexus sectionnexus-work=${bundleBasedir}/../sonatype-work/nexusruntime=${bundleBasedir}/nexus/WEB-INF1.2.3.4.5.6.7.8.9.10.
编辑 nexus 脚本,配置 RUN_AS_USER 参数
# vi /usr/local/nexus/nexus-2.11.2-03/bin/nexus#RUN_AS_USER=1.2.
改为:
RUN_AS_USER=root1.
防火墙中打开 8081 端口
# vi /etc/sysconfig/iptables1.
添加:
-A INPUT -m state --state NEW -m tcp -p tcp --dport 8081 -j ACCEPT1.
保存好后重启防火墙
# service iptables restart1.
启动 nexus
# /usr/local/nexus/nexus-2.11.2-03/bin/nexus start****************************************WARNING - NOT RECOMMENDED TO RUN AS usr/local****************************************Starting Nexus OSS...Started Nexus OSS.1.2.3.4.5.6.
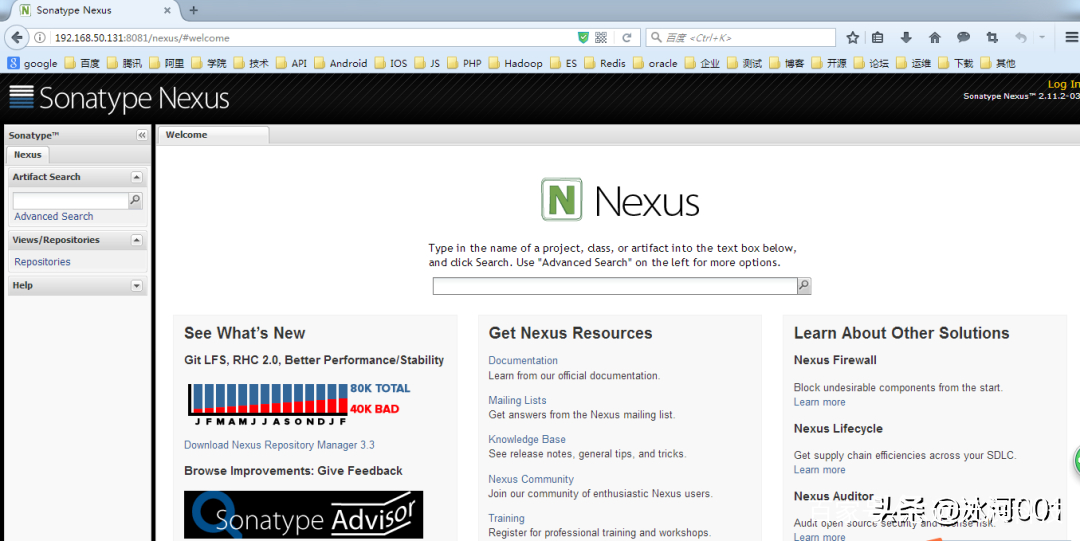
访问nexus
浏览器中打开:http://192.168.50.131:8081/nexus/
 编辑搜图
编辑搜图
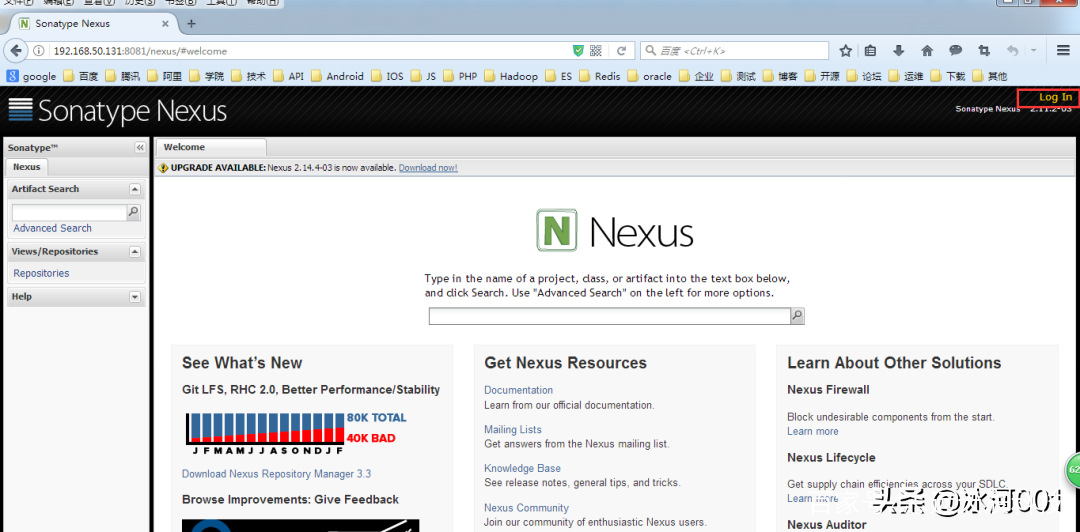
登录nexus
默认用户名admin,默认密码admin123。
 编辑搜图
编辑搜图
 编辑搜图
编辑搜图
 编辑搜图
编辑搜图
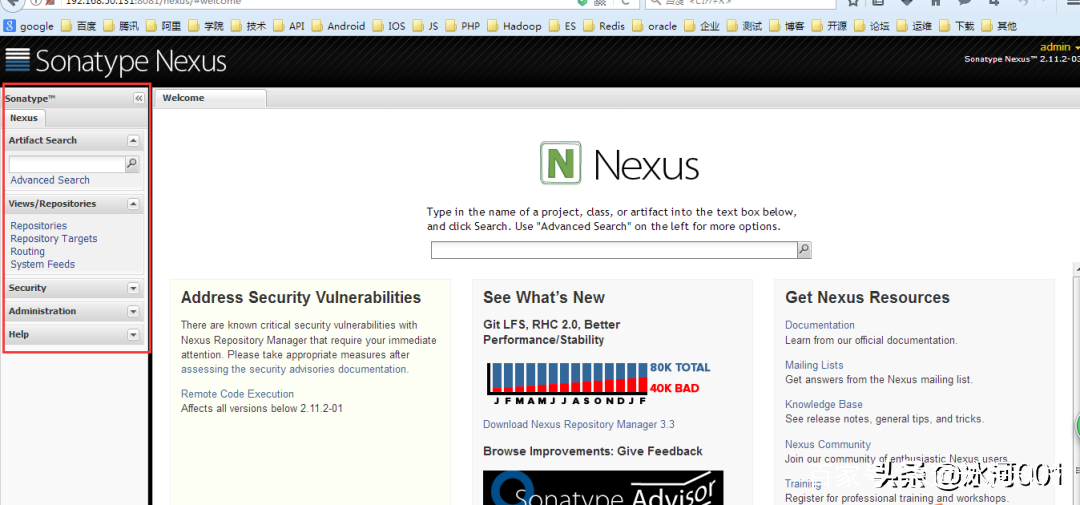
到此, Nexus 已安装完成, 接下来是 Nexus 的配置
Nexus 配置(登录后)
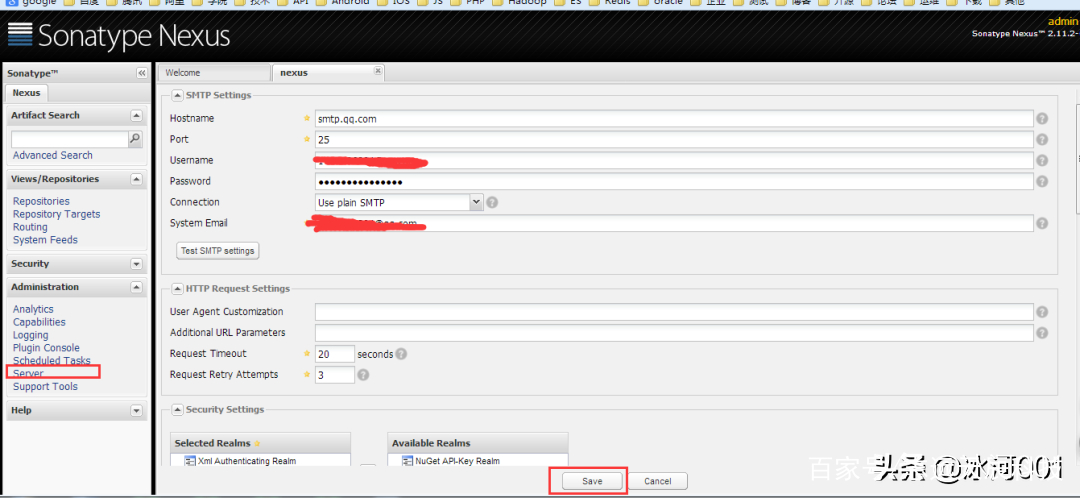
设置管理员邮箱
菜单 Administration/Server 配置邮箱服务地址(如果忘记密码,可以通过该邮箱找回密码)
 编辑搜图
编辑搜图
设置用户邮箱
给用户配置邮箱地址,方便忘记密码时找回:
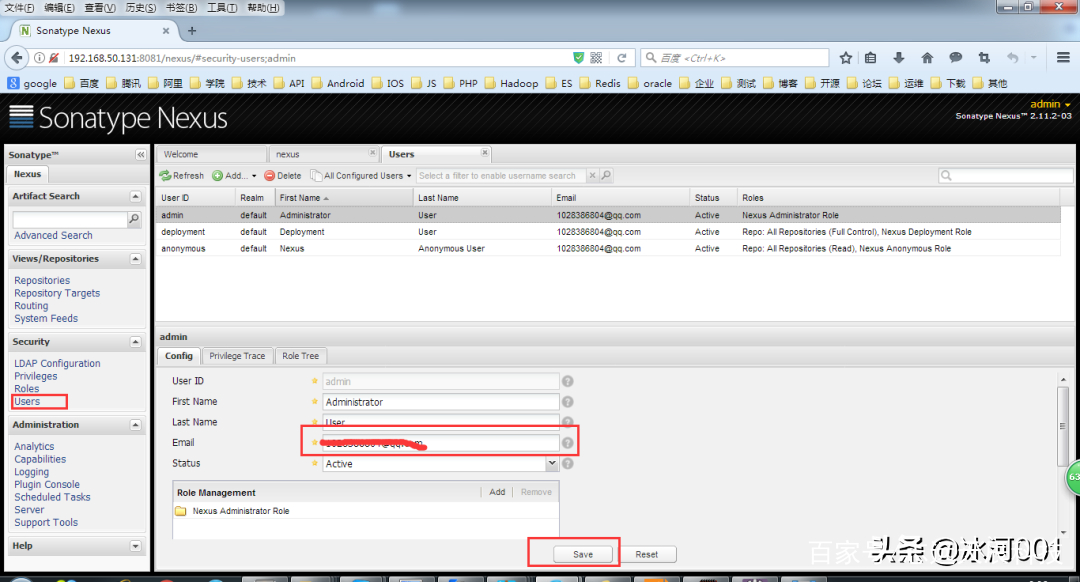 编辑搜图
编辑搜图
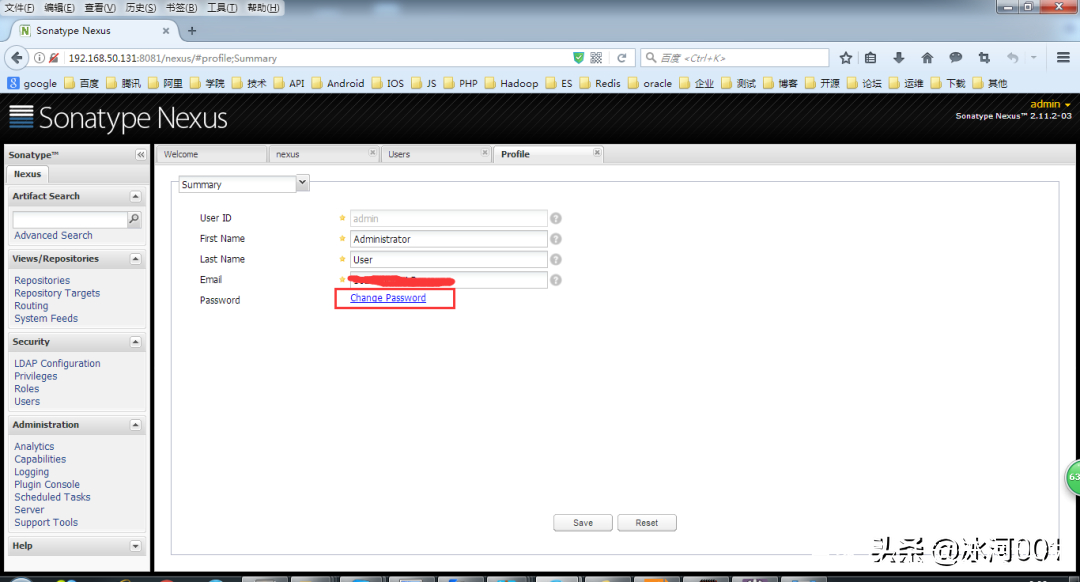
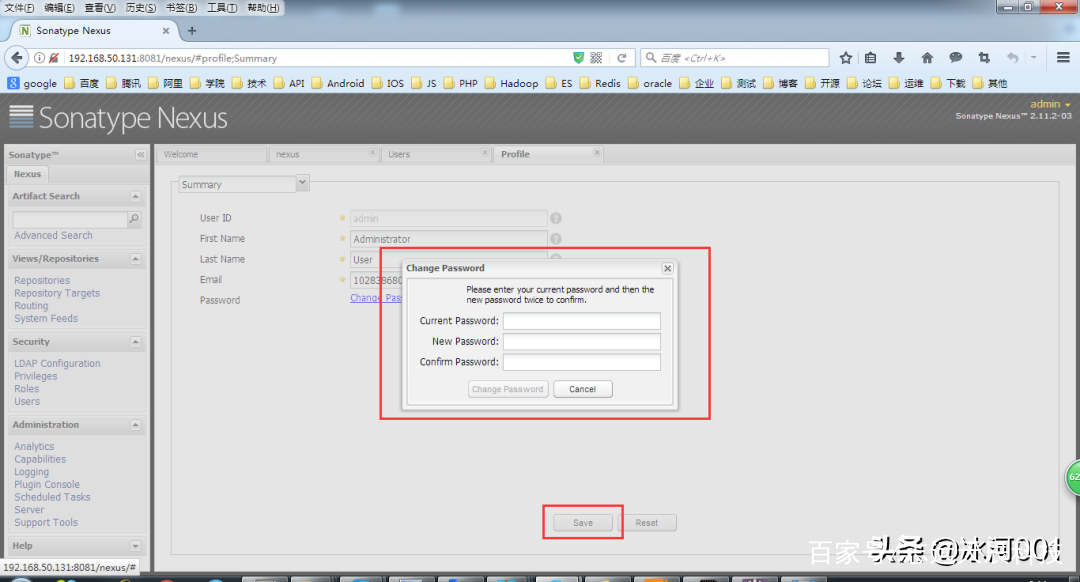
用户修改密码
 编辑搜图
编辑搜图
 编辑搜图
编辑搜图
 编辑搜图
编辑搜图
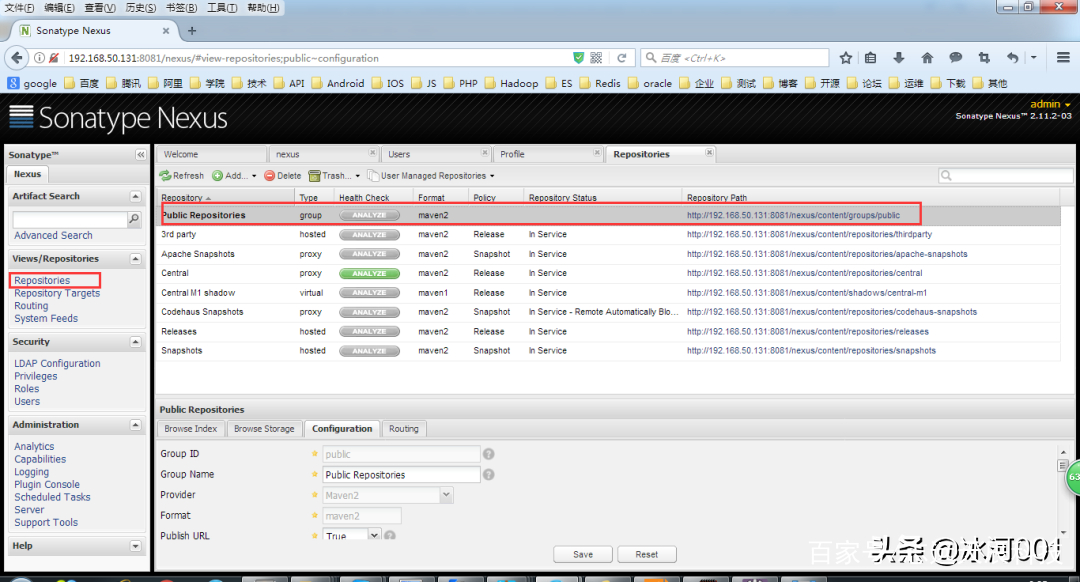
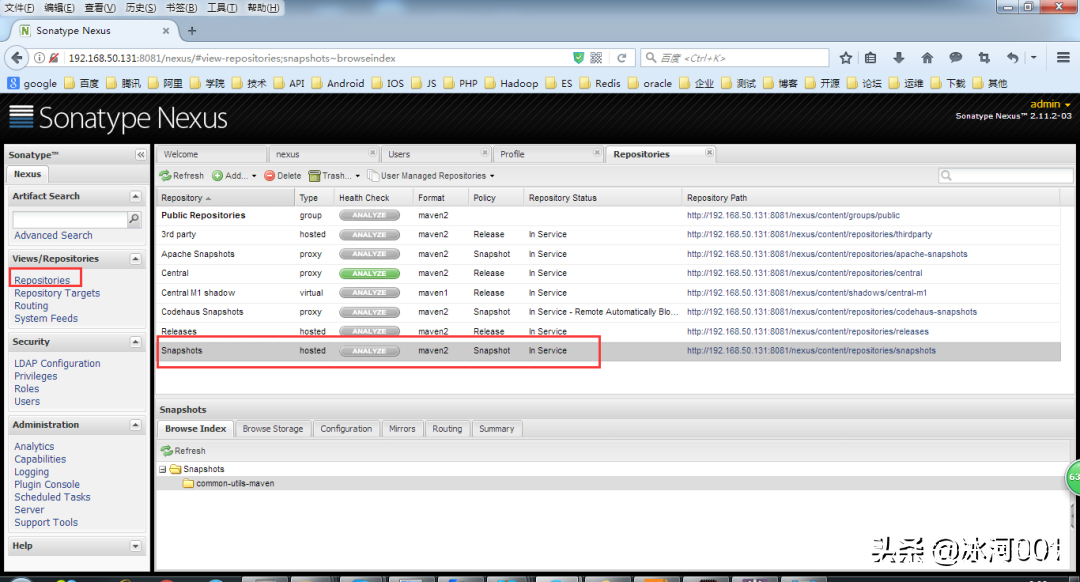
仓库类型
 编辑搜图
编辑搜图
-
group 仓库组:Nexus通过仓库组的概念统一管理多个仓库,这样我们在项目中直接请求仓库组即可请求到仓库组管理的多个仓库;
-
hosted 宿主仓库:主要用于发布内部项目构件或第三方的项目构件 (如购买商业的构件)以及无法从公共仓库获取的构件(如 oracle 的 JDBC 驱动)proxy 代理仓库:代理公共的远程仓库;
-
virtual 虚拟仓库:用于适配 Maven 1;
一般用到的仓库种类是什么 hosted、 proxy。
Hosted 仓库常用类型说明:
-
releases 内部的模块中 release 模块的发布仓库
-
snapshots 发布内部的 SNAPSHOT 模块的仓库
-
3rd party 第三方依赖的仓库,这个数据通常是由内部人员自行下载之后发布上去
如果构建的 Maven 项目本地仓库没有对应的依赖包,那么就会去 Nexus 私服去下载,如果Nexus私服也没有此依赖包,就回去远程中央仓库下载依赖,这些中央仓库就是 proxy。Nexus 私服下载成功后再下载至本地 Maven 库供项目引用。
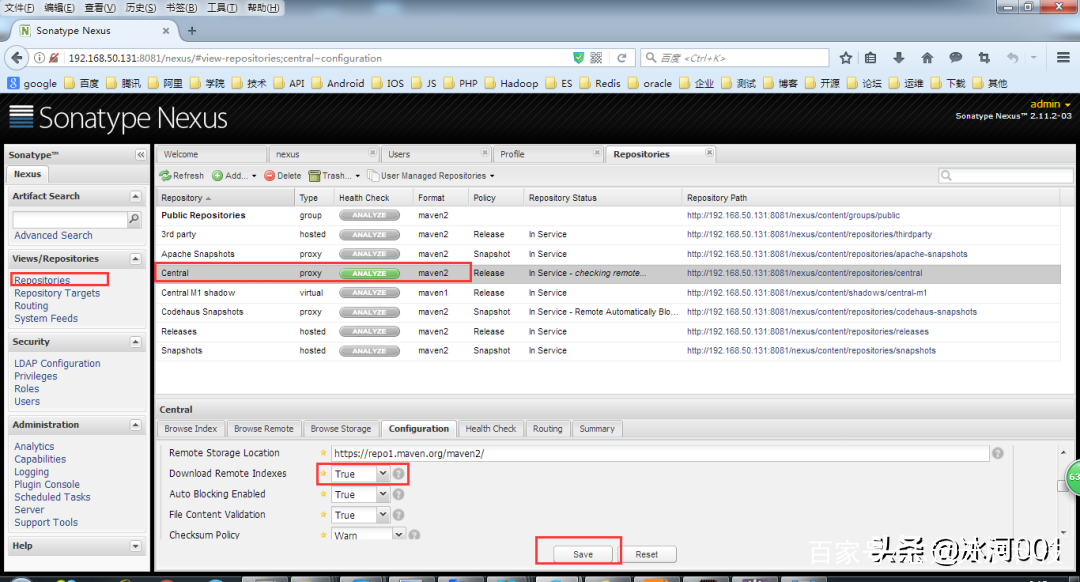
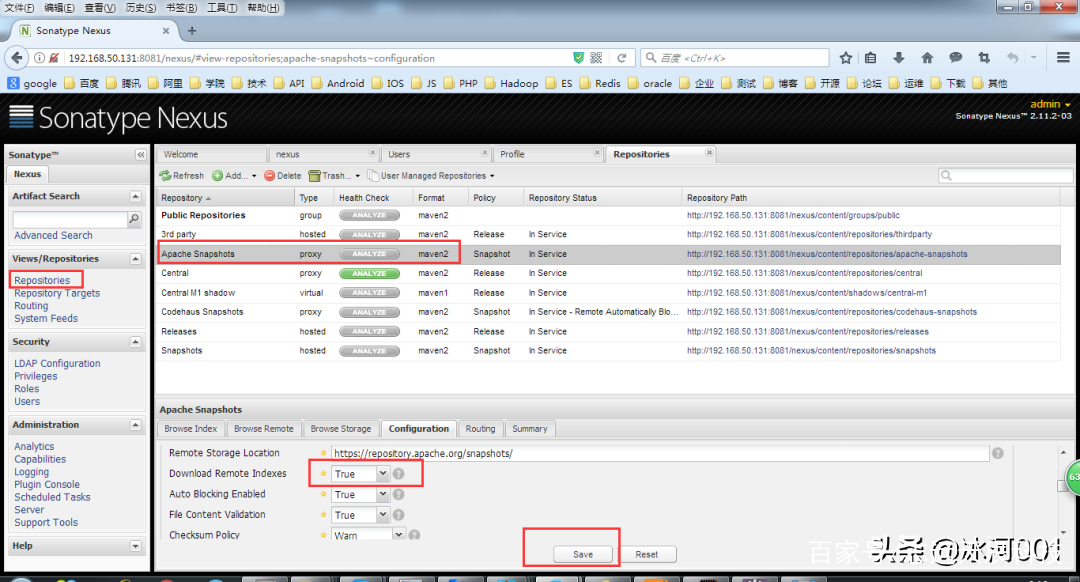
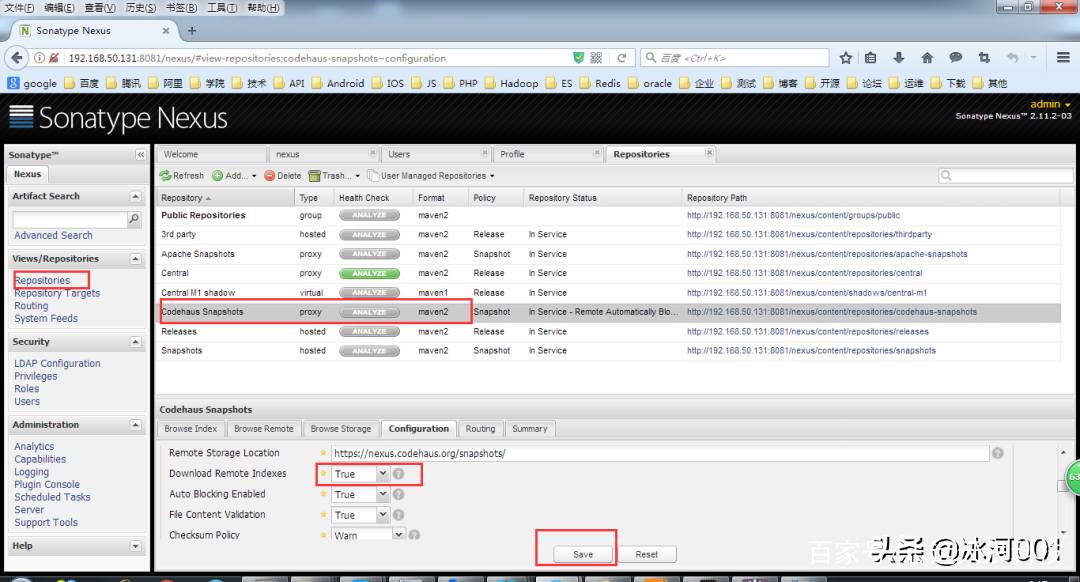
设置 proxy 代理仓库
设置 proxy 代理仓库(Apache Snapshots/Central/Codehaus Snapshots)准许远程下载,如下所示。
 编辑搜图
编辑搜图
 编辑搜图
编辑搜图
 编辑搜图
编辑搜图
Maven 本地库的安装与配置
下载Maven
配置Maven环境变量
vim /etc/profileMAVEN_HOME=/usr/local/mavenJAVA_HOME=/usr/local/jdkCLASS_PATH=$JAVA_HOME/libPATH=$JAVA_HOME/bin:$MAVEN_HOME/bin:$PATHexport JAVA_HOME MAVEN_HOME CLASS_PATH PATHsource /etc/profile1.2.3.4.5.6.7.8.9.
配置本地Maven
拷贝Maven的conf目录下的配置文件settings.xml,重命名为settings-lyz.xml,修改配置文件后的内容如下:
<?xml version="1.0" encoding="UTF-8"?><settings xmlns="http://maven.apache.org/SETTINGS/1.0.0"
          xmlns:xsi="http://www.w3.org/2001/XMLSchema-instance"
          xsi:schemaLocation="http://maven.apache.org/SETTINGS/1.0.0 http://maven.apache.org/xsd/settings-1.0.0.xsd">
 <localRepository>D:/Maven_Repository/.m2/repository</localRepository>
 <interactiveMode>true</interactiveMode>
    <offline>false</offline>
    <pluginGroups>
        <pluginGroup>org.mortbay.jetty</pluginGroup>
        <pluginGroup>org.jenkins-ci.tools</pluginGroup>
    </pluginGroups>

 <!--配置权限,使用默认用户-->
 <servers>
  <server>
   <id>nexus-releases</id>
   <username>deployment</username>
   <password>deployment123</password>
  </server>
  <server>
   <id>nexus-snapshots</id>
   <username>deployment</username>
   <password>deployment123</password>
  </server>
 </servers>

    <mirrors>

    </mirrors>

 <profiles>
  <profile>
     <id>lyz</id>
       <activation>
                    <activeByDefault>false</activeByDefault>
                    <jdk>1.8</jdk>
                </activation>
       <repositories>
     <!-- 私有库地址-->
        <repository>
      <id>nexus</id>
      <url>http://192.168.50.131:8081/nexus/content/groups/public/</url>
      <releases>
       <enabled>true</enabled>
      </releases>
      <snapshots>
       <enabled>true</enabled>
      </snapshots>
     </repository>
    </repositories>
    <pluginRepositories>
     <!--插件库地址-->
     <pluginRepository>
      <id>nexus</id>
      <url>http://192.168.50.131:8081/nexus/content/groups/public/</url>
      <releases>
       <enabled>true</enabled>
      </releases>
      <snapshots>
       <enabled>true</enabled>
        </snapshots>
     </pluginRepository>
    </pluginRepositories>
   </profile>
 </profiles>

 <!--激活profile-->
 <activeProfiles>
  <activeProfile>lyz</activeProfile>
 </activeProfiles></settings>1.2.3.4.5.6.7.8.9.10.11.12.13.14.15.16.17.18.19.20.21.22.23.24.25.26.27.28.29.30.31.32.33.34.35.36.37.38.39.40.41.42.43.44.45.46.47.48.49.50.51.52.53.54.55.56.57.58.59.60.61.62.63.64.65.66.67.68.69.70.71.72.
其中,配置文件中的
<localRepository>D:/Maven_Repository/.m2/repository</localRepository>1.
说明本地仓库位于D:/Maven_Repository/.m2/repository目录下。
配置文件中的如下配置项。
<url>http://192.168.50.131:8081/nexus/content/groups/public/</url>1.
与下图中的链接一致:
 编辑搜图
编辑搜图
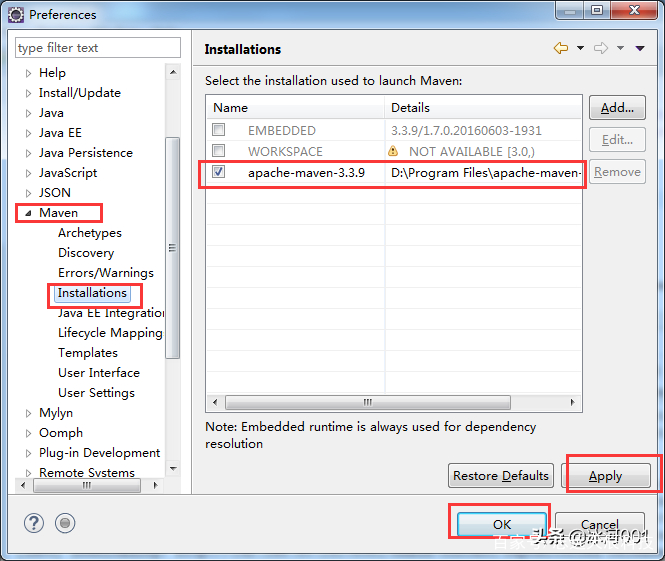
配置Eclipse Maven
 编辑搜图
编辑搜图
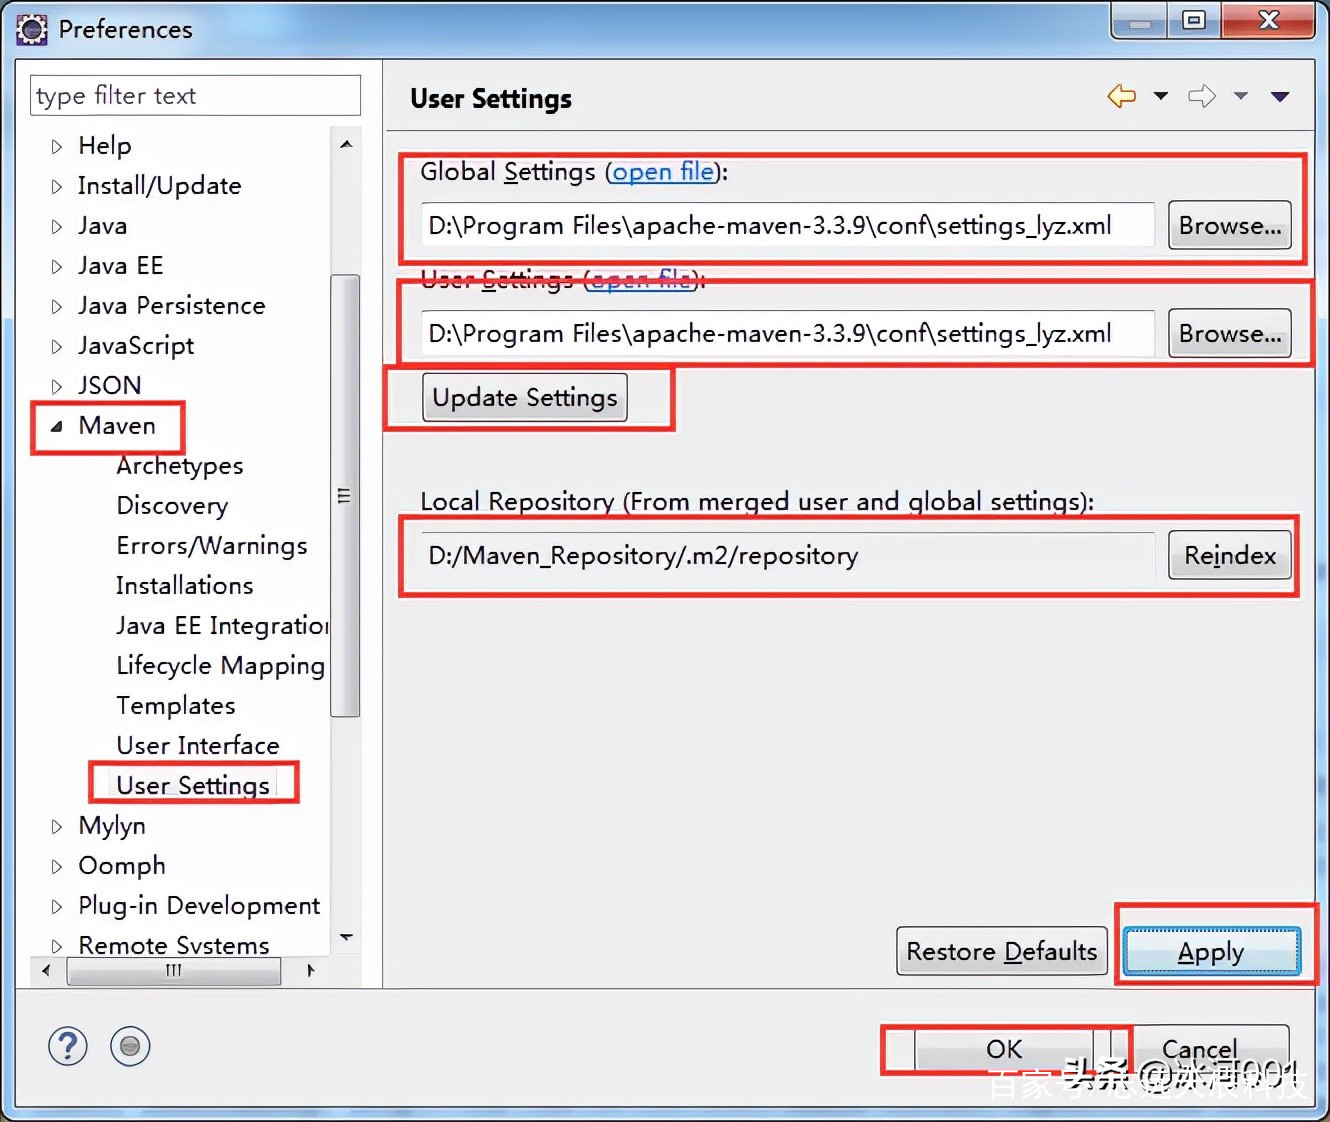 编辑搜图
编辑搜图
配置IDEA Maven
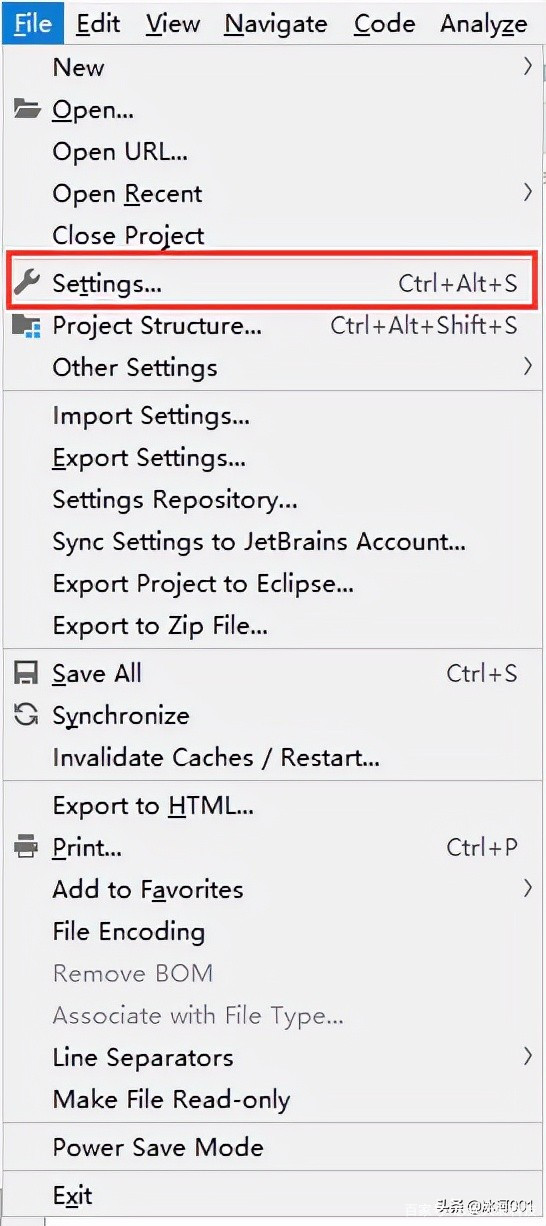 编辑搜图
编辑搜图
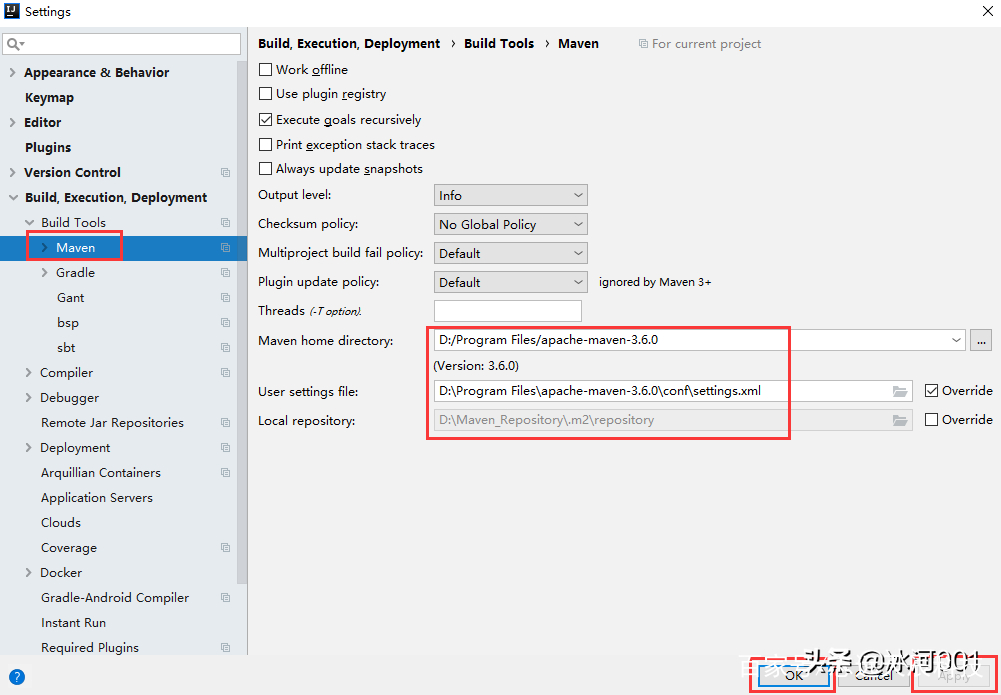 编辑搜图
编辑搜图
项目的构建与发布
首先我们要在项目的pom.xml文件中加入如下内容,将项目构建成的Jar发布到Maven私有仓库
<distributionManagement>
    <repository>
        <id>nexus-releases</id>
        <name>Nexus Release Repository</name>
        <url>http://192.168.50.131:8081/nexus/content/repositories/releases/</url>
    </repository>
    <snapshotRepository>
        <id>nexus-snapshots</id>
        <name>Nexus Snapshot Repository</name>
        <url>http://192.168.50.131:8081/nexus/content/repositories/snapshots/</url>
    </snapshotRepository></distributionManagement>1.2.3.4.5.6.7.8.9.10.11.12.
配置说明
项目中的pom.xml文件中,如果版本配置如下:
<version>0.0.1-SNAPSHOT</version>1.
则发布到Maven私有仓库后对应的目录如下:
 编辑搜图
编辑搜图
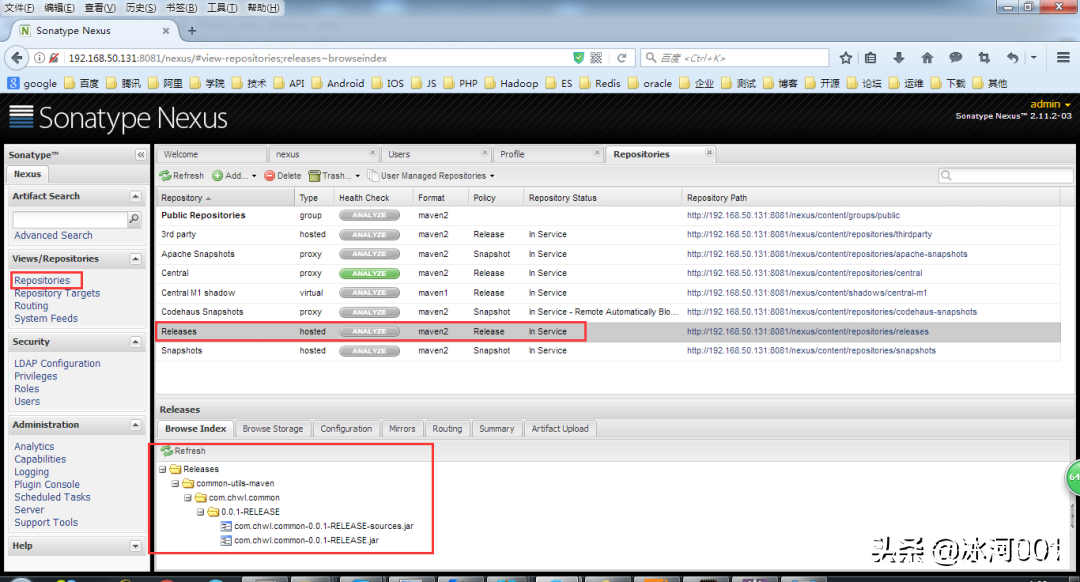
如果版本配置如下:
<version>0.0.1-RELEASE</version>1.
则发布到Maven私有仓库后对应的目录如下。
 编辑搜图
编辑搜图
完整pom.xml文件的配置如下所示。
<project xmlns="http://maven.apache.org/POM/4.0.0" xmlns:xsi="http://www.w3.org/2001/XMLSchema-instance"
    xsi:schemaLocation="http://maven.apache.org/POM/4.0.0 http://maven.apache.org/xsd/maven-4.0.0.xsd">
    <modelVersion>4.0.0</modelVersion>
    <groupId>common-utils-maven</groupId>
    <artifactId>com.chwl.common</artifactId>
    <version>0.0.1-SNAPSHOT</version>
    <distributionManagement>
        <repository>
            <id>nexus-releases</id>
            <name>Nexus Release Repository</name>
            <url>http://192.168.50.131:8081/nexus/content/repositories/releases/</url>
        </repository>
        <snapshotRepository>
            <id>nexus-snapshots</id>
            <name>Nexus Snapshot Repository</name>
            <url>http://192.168.50.131:8081/nexus/content/repositories/snapshots/</url>
        </snapshotRepository>
    </distributionManagement>
    <properties>
        <project.build.sourceEncoding>UTF-8</project.build.sourceEncoding>
        <jdk.version>1.8</jdk.version>
    </properties>
    <dependencies>
       此处省略....    </dependencies>
    <build>
        <plugins>
            <plugin>
                <groupId>org.apache.maven.plugins</groupId>
                <artifactId>maven-compiler-plugin</artifactId>
                <configuration>
                    <source>${jdk.version}</source>
                    <target>${jdk.version}</target>
                    <encoding>${project.build.sourceEncoding}</encoding>
                </configuration>
            </plugin>
            <plugin>
                <groupId>org.apache.maven.plugins</groupId>
                <artifactId>maven-source-plugin</artifactId>
                <version>2.1.2</version>
                <executions>
                    <execution>
                        <id>attach-sources</id>
                        <goals>
                            <goal>jar</goal>
                        </goals>
                    </execution>
                </executions>
            </plugin>
        </plugins>
    </build></project>1.2.3.4.5.6.7.8.9.10.11.12.13.14.15.16.17.18.19.20.21.22.23.24.25.26.27.28.29.30.31.32.33.34.35.36.37.38.39.40.41.42.43.44.45.46.47.48.49.50.51.52.
具体发布步骤如下:
右键pom.xml->Run as->Maven build->
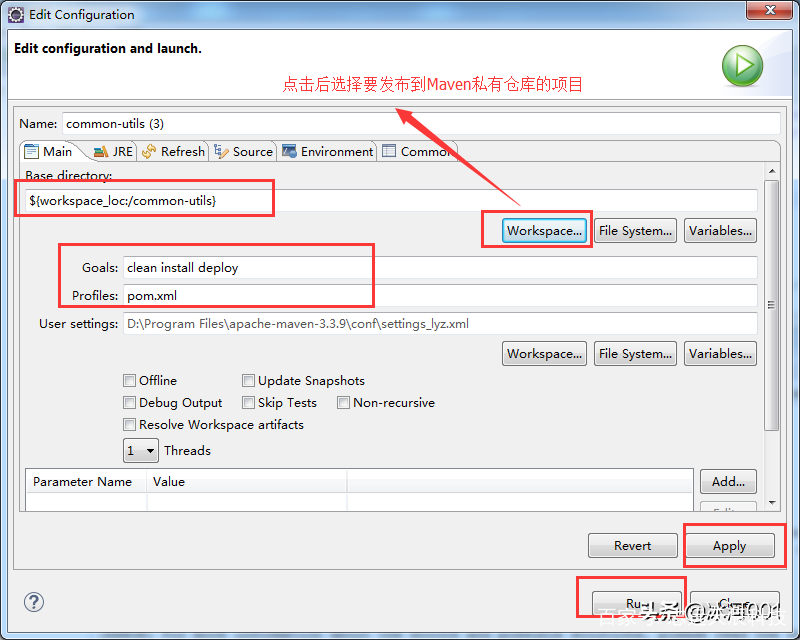 编辑搜图
编辑搜图
 编辑搜图
编辑搜图
上图中的私有库为空,我们右键pom.xml->Run as->Maven build(此时pom.xml文件的version为0.0.1-SNAPSHOT)。
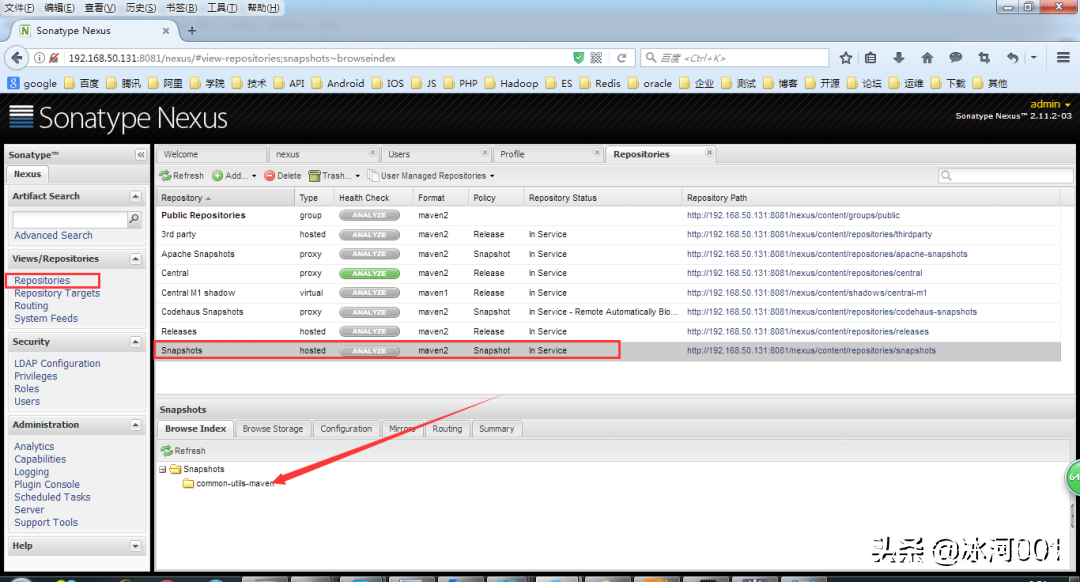
构建完毕后
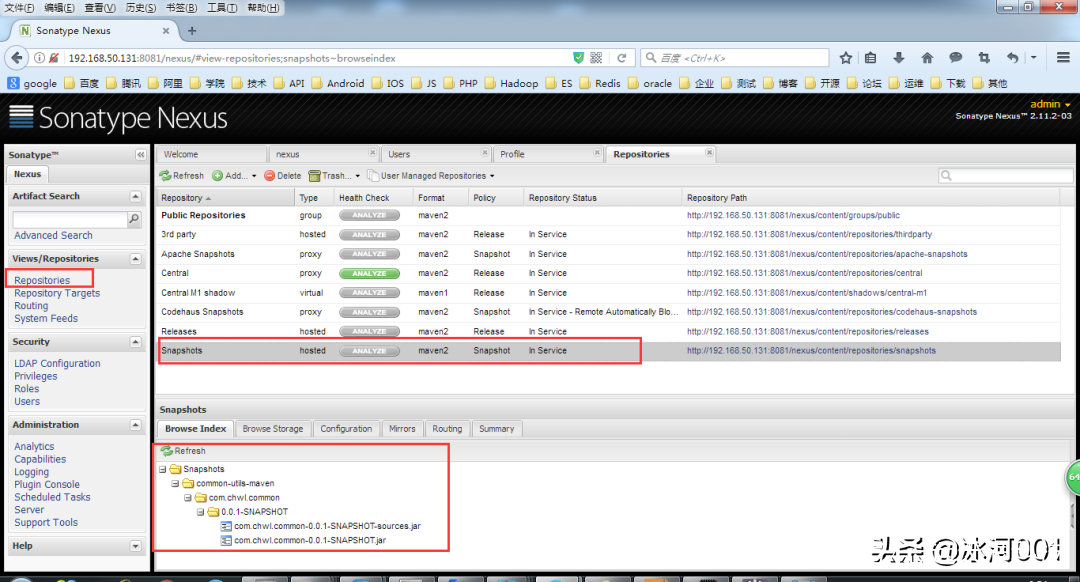 编辑搜图
编辑搜图
说明已经将项目构建并发布到了我们的Maven私有仓库。
 编辑搜图
编辑搜图
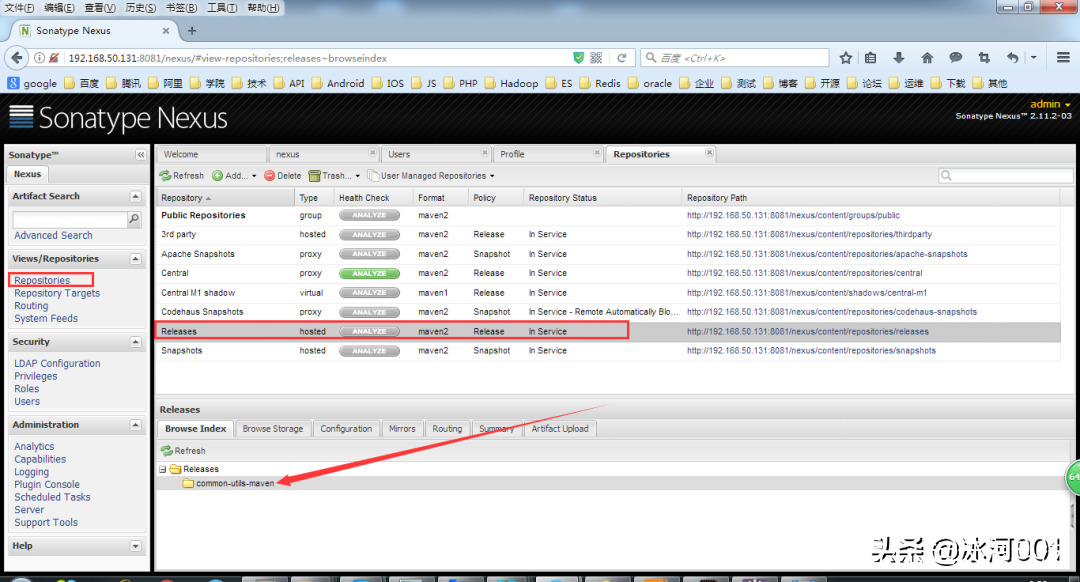
此时,上图中的Release目录为空,此时,我们修改pom.xml的version为0.0.1-RELEASE,再次右键pom.xml->Run as->Maven build,构建项目,此时发布的目录如下图:
 编辑搜图
编辑搜图
说明已经将项目构建并发布到了我们的Maven私有仓库。
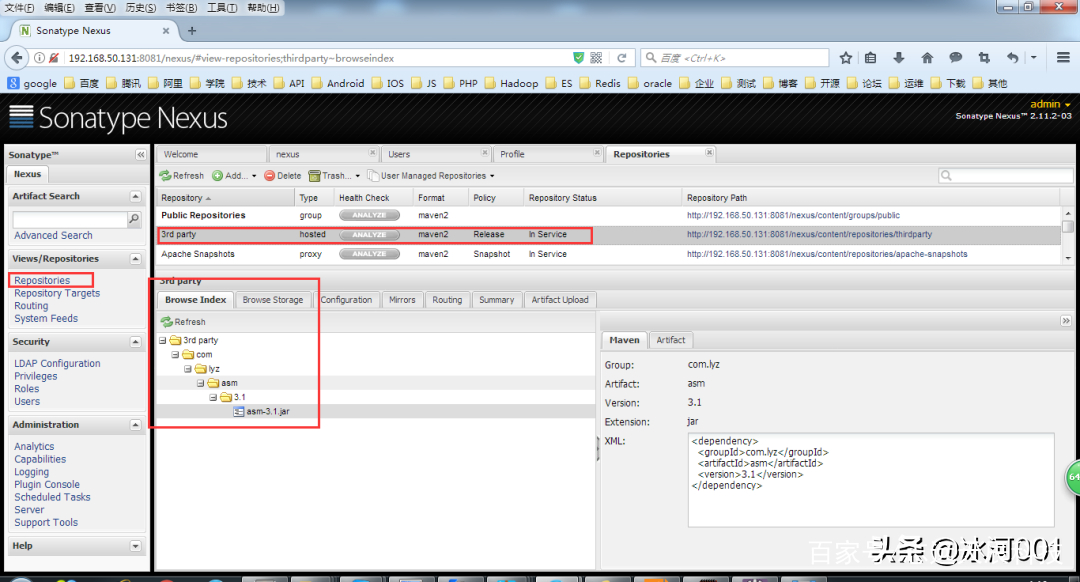
最后,我们添加第三方的Jar依赖到我们的Maven私有仓库,具体操作如下:
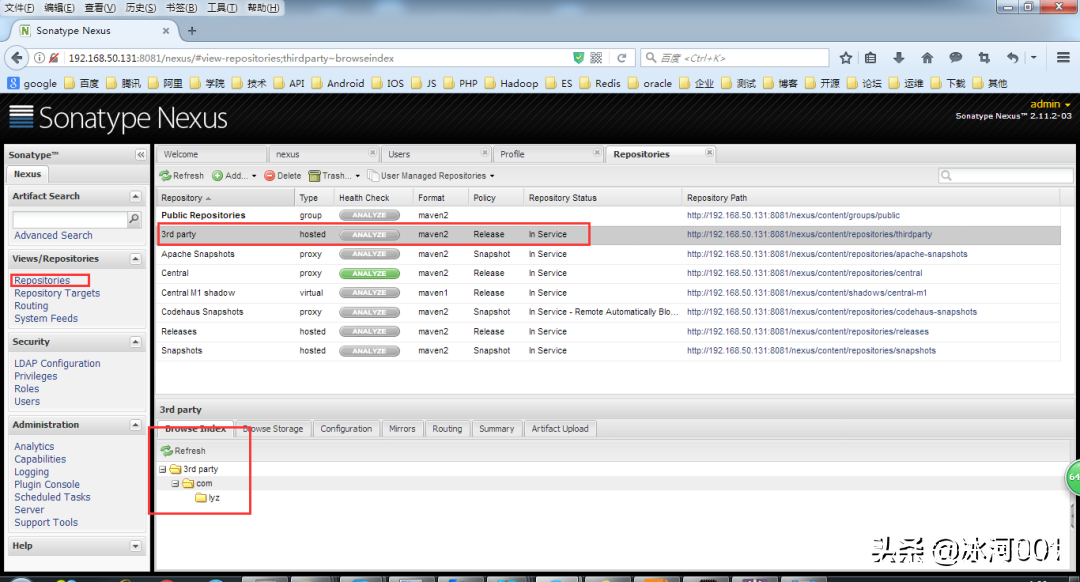 编辑搜图
编辑搜图
如上图,第三方依赖私有仓库为空,我们按照以下步骤上传第三方依赖到我们的Maven私有仓库。
 编辑搜图
编辑搜图
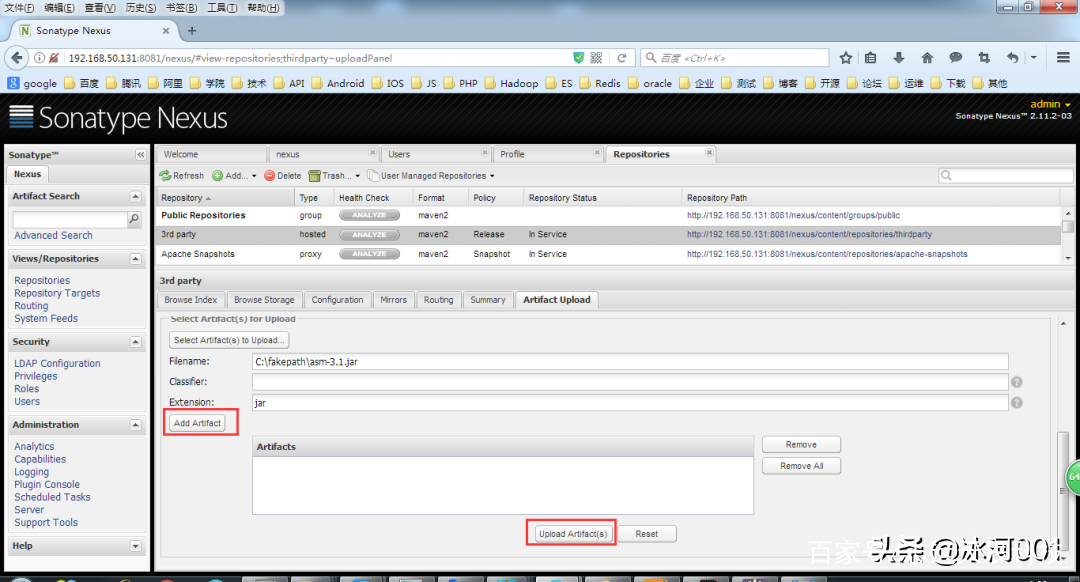 编辑搜图
编辑搜图
 编辑搜图
编辑搜图
 编辑搜图
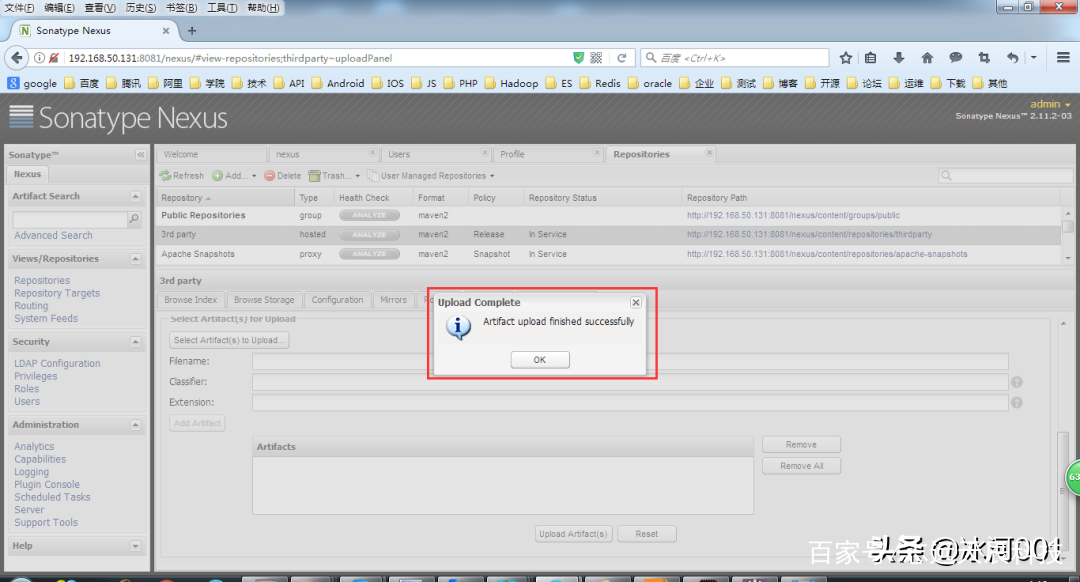
编辑搜图
如上图,第三方依赖已经上传到我们的Maven私有仓库。
至此,Maven 私有库和本地库的安装与配置到此结束。
可优惠产品清单

一次合作 终生朋友

部分客户(无排名)


我有话说: